One of the most important things to do in getting your cross-stitch project going is to put grid lines on your fabric. It is very difficult to keep track of where to place your stitches without them. What you are doing is putting the chart grid lines of your design pattern onto your fabric, which will act as a guide for stitching and will make it easy to move from area to area in your pattern.
Most design charts have heavy grid lines every ten threads both vertically and horizontally. However, be sure to check your pattern to verify this. One of the designs I did several years ago had grid lines for every 14 threads. I didn’t check my pattern before I put the grid lines on my fabric and did the usual ten threads. I didn’t realize this until my entire fabric was marked, and I was ready to start stitching. My, what an unpleasant surprise I had! I had to remove all the grid lines and do them over again! I’ll NEVER do that again.
There are several ways to do the grid lines. You can use floss, marking pens, pencils, etc.; however, I don’t recommend them for the following reasons. Floss lines will disappear as you stitch, and you will have to redo them many times and spend unnecessary time counting and recounting. Also, the floss color you choose for your grid lines could be very close in color to the colors in the design, and you will find them hard to see. Marking pencils can contain chemicals that could injure your fabric or floss over time (even the ones that have ink that is said to disappear when cold water is applied), and you would never want that to happen. Pencils leave residues and could permanently soil your floss, especially the light colors.
Instead I STRONGLY recommend a product called Easy-Count Guideline. It is a nylon thread that does not get caught up in your stitching and is easy to remove, and it can speed your stitching time by up to a third. Not all needlework departments carry it, so if you can’t find it, you can order it online. There are 100 yards on a spool, and it costs about $9 – well worth the price. Since it’s a nylon thread, it’s a little tricky to work with at first. It’s somewhat stiff and has a mind of its own, but it’s worth the time learning how to control it – it will become your best friend!
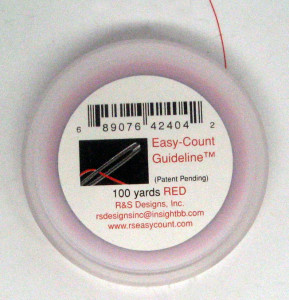
Easy-Count Guideline Thread
When I use the nylon marking thread, I do not cut a length and start marking the grid lines. Instead, I thread my needle with the nylon thread, work the grid line (go over eight threads and under two) and pull the thread out of its case as I go along, cutting it off after I’ve gone through the margin at the opposite edge of the fabric. There are a couple of reasons I make sure the marking thread goes past the edge of the fabric. First, you don’t waste any of the marking thread by cutting off more than you need, and second, since this marking thread is quite stiff, it can catch the floss as you are stitching if the thread end is within the design area – it doesn’t hurt the floss, it’s just frustrating when it does that. Oh yes, another thing that will make things go smoothly . . . after filling in the grid lines vertically and you are starting on the horizontal lines (or vice versa), keep the “two under stitches” of your horizontal lines at the midpoint of your gridded square. (See illustration.)
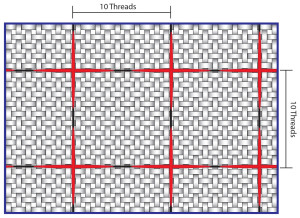
Add grid lines to your cross stitch project
As you are putting your grid lines on your fabric, recount the number of threads between each grid line at the beginning and end of every line you put in. If you are off one thread, it is much easier to redo one line rather than all the ones that will follow it. Those few seconds could save you from having to redo many grid lines. And, of course, I wouldn’t be emphasizing this if I hadn’t had first-hand experience!
Finally, I make sure the nylon thread reaches to the edges of my fabric and then I incorporate that into my edge finishing. It works well if you are using masking tape or serging your edges.
SerenityStitchworks.com gives you “no nonsense” information in all areas which will save you time and frustration. After all, we love this hobby and want it to be relaxing and fun!